-
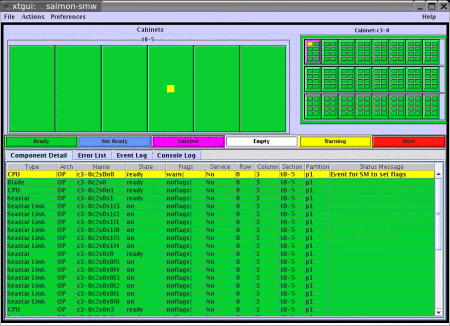
Figure 1: XTGUI Main Frame
Click here for presentation slides in PDF format.
Cray XT series systems can scale from small, single-cabinet systems to enormous systems configured into hundreds of cabinets with hundreds of thousands of components. All system components are monitored and managed through the Cray RAS and Management System (CRMS), the integrated, independent system that monitors system components, manages hardware and software failures, controls startup and shutdown processes, and manages the interconnection network..
The XTGUI tool is a Java based client/server application for the CRMS. It simplifies the monitoring and management of the XT series hardware. Released with XT v1.5, the XTGUI provides near real-time monitoring of the status of XT series system components (cabinets, blades, CPUs, seastar processors and seastar links). It allows quick and easy component fault identification. The XTGUI also offers the capability to configure and modify the state of system components, and it supports all xtcli commands (with the exception of boot).
The XTGUI application consists of a server side, written in a combination of C and Java, and a client side, which is a Java application.
The server process runs on the Cray XT SMW. It collects information on all the major components of the XT system (cabinets, blades, CPUs, seastars and seastar links) by listening to CRMS events. It then forwards this information to all connected XTGUI client processes. The server also executes xtcli commands on behalf of XTGUI client processes.
The client side is the user interface portion of the application. It presents a color-coded, graphical view of the current state of all XT system components; and it offers the capability for the client to send commands back to the SMW to manage XT system components.
The XTGUI server process operates in either of two modes to allow XTGUI client connections:
In standard mode, any network-attached XTGUI client can connect.
In SMW Only mode, the server process will allow connections only from clients that are running on the SMW. SMW Only mode is controlled by an option in the XTGUI server startup script (/opt/cray/bin/RsmsGUIServer).
XTGUI client password-level access control and encrypted data communications from remote sites can be accommodated. vncserver is run on a secure workstation or the SMW. You can ssh into a secure site from remote location and then use vncviewer to run the XTGUI on the secure platform. The XTGUI application will then be displayed on the remote system.
The XTGUI server process is started on the SMW with a CRMS demon. The server process provides the following functions:
There are two log files associated with the XTGUI server:
A startup/error log: /opt/craylog/XTGUIserver.out. This log contains server operational status messages.
An application log: /opt/craylog/RsmsJServer.log.mmddyy. This log contains a copy of significant XTGUI client related events, such as xtcli commands executed on behalf of clients.
The XTGUI server process reads a properties file (/opt/cray/etc/RsmsJServerProperties.txt) upon startup. Here, various options may be set to modify the operational behavior of the server. For example:
# The buffer size (number of lines to read) used when “tailing" server log files.
server.watchedFileBufferSize=200
# The frequency with which log files are examined for new data
server.watchedFileLatencyMilliseconds=5000
The XTGUI process is summarized as follows:
Upon client startup, the file RsmsClientProperties.txt (located in the users home directory), is read. Various user options are saved in this file, as well as a number of client configuration parameters.
|
|
The XTGUI is presented in six main views. These are described in the following sections.
The system map is a color-coded view of how cabinets are arranged on the computer floor. It is presented at the top left of the application frame. The system map provides a visual representation of each XT cabinet that indicates the state of all major system components. This allows the system operator to easily see the status of all system components, including any existing error conditions.
If any subcomponent within a cabinet is under a warning or alert condition, a colored rectangle will indicate such within the affected cabinet on the system map. For example, In Figure #1, above, a warning condition exists on CPU c3-0c2s0n3. A corresponding yellow rectangle on the system map indicates an error condition on a subcomponent within cabinet c3-0 . If the operator clicks on this cabinet, s/he will see a detailed view that shows all cabinet subcomponents. Depending on whether the Component Detail subview or the Error List View subview has been selected, clicking on a cabinet in the system map will modify the information presentation in the Active subview.
|
|
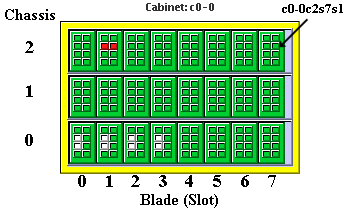
The Cabinet Detail view shows the state of a selected cabinet and its components. Each blade within the cabinet is shown, including each blade's CPU and Seastar processor. The state of a Seastar or any of its links is color-indicated. Depending on whether the Component Detail (see Figure 4, below) or the Error List View subview has been selected, when you click on a component in the Cabinet Detail view, the information in the Active subview is modified -- that is, the data is sorted to show the selected component at the top of the table, followed by any associated subcomponents. For example, in Figure 1 above, the CPU in the warning state has been selected. That component and all other components on that blade are shown at the top of the table in the Component Detail view (Figure 4). The blade that houses the selected component within the Cabinet Detail view has also been selected. This makes it easy to keep track of which component has been selected and where it is located within the cabinet.
|
|
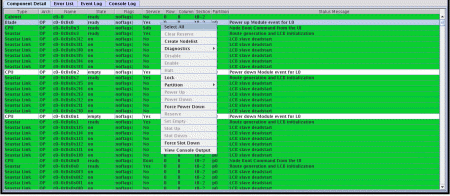
The component detail view provides information on each component within the selected cabinet or blade.
|
|
When a column header is selected, the table re-sorts according to that column's data. If the component detail table, system log, console log, or any other tab (except the error list tab) is selected when a cabinet in the system map or a component in the cabinet detail view is displayed, the top of the component detail table will fill with records of the selected cabinet/component and associated subcomponents.
When in the Component Detail, the right mouse button brings up a menu with the following options:
|
Clear Reserve |
Create Nodelist |
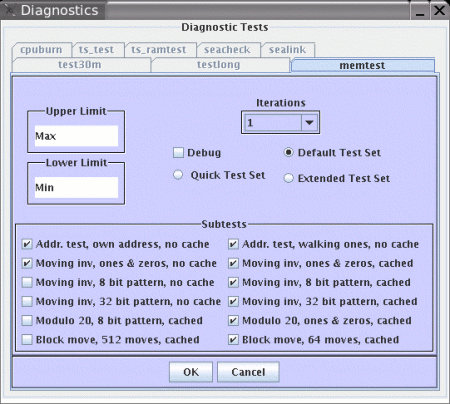
Diagnostics |
|
Disable |
Enable |
Halt |
|
Lock |
Partition |
Power Up |
|
Power Down |
Force Power Down |
Reserve |
|
Set Empty |
Slot Up |
Slot Down |
|
Force Slot Down |
View Console Output |
|
All menu options in the Component Detail view are context-sensitive, so a selected option will affect only components on which such an operation is possible, and in consideration of the type and state of the selected components.
|
When any menu option is chosen, the user must then confirm Yes/No to proceed or not. |
|
|
Clear Reserve |
This option releases a reserved component to normal operation. As a reserved component can not accept new jobs, but current jobs are completed. |
|
Create Nodelist |
This option creates a list of selected nodes. If you select a cabinet or blade, all of their component nodes are added to the nodelist. If you select individual nodes, only they are added to the nodelist. This option is similar to the Save Node List option on the File menu, except that that option creates a list of all nodes in the entire system. By default, this file is written to your home directory and named RsmsNodeList-MMDD-HHMM.SS.txt |
|
|
A
progress dialog window is shown during the the diagnostic test.
Diagnostics Operation
When the diagnostic test completes, a diagnostic summary tab is added to the XTGUI display. Right-click on this window to bring up options to:
close tab
close all diagnostics tabs
|
|
Detail Menu Options
|
Disable |
If links, nodes, or Cray Seastar chips have hardware problems, you can mark the component as "downed" so that it can not be reallocated into service. |
|
Enable |
Re-enable a component and return it to normal operation. |
|
Halt |
Stop a component. The component immediately ceases operation, however any data or processes running on it are lost. |
|
Lock |
Locks a component manually. Components are locked automatically when a command that can change their state is running. As the command is started, the state manager locks the component so that nothing else can affect the component's state while the command is running. When a manager is finished with a command, it unlocks the component automatically. If the manager for some reason fails to unlock the component, it can be unlocked manually with the Show Locks option on the Actions menu . |
Detail Menu Options
|
Power Up |
Power up a component. Power commands are hierarchical -- that is, there are a number of ways to power up or power down a lower-level component. For example, to power up a node, you can power it up directly or power up a component of which it is a part, such as a blade. |
|
Power Down |
Power down a component. Powering down a cabinet powers down all components within the cabinet, including the L0 controllers. |
|
Force Power Down |
Force a power down of a component. If you choose this option, the power manager ignores the operational state of the components that are being powered down. |
|
Reserve |
Reserve a component. Once a component is reserved, it will not accept new jobs, but any jobs running on the component are completed as normal. |
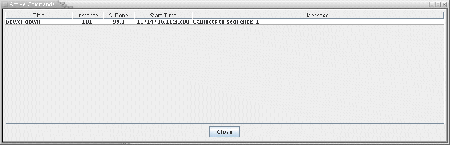
All components under a current warning or alert status are shown in the error list. If the error list has been selected and you click on a cabinet in the system map, or on a component in the cabinet detail view, any records on the list will sort so that the selected component and its associated subcomponents are moved to the top. If you select table column headers, the table will sort on the contents of that column.
Components are selected with the left mouse button. When a component is selected, the cabinet detail map displays the cabinet with the selected component, plus the blade that houses it. This helps locate it.
The right mouse button brings up a menu with the following options:
Select All
Clear Warning
Clear Alert
|
|
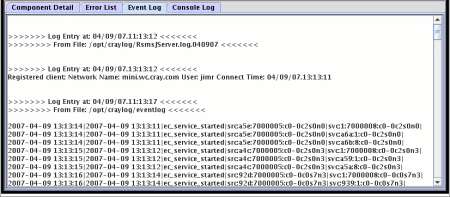
The event log displays recent information sent to files monitored by the XTGUI server. It also displays all commands executed by the XTGUI server on behalf of the XTGUI client.
|
|
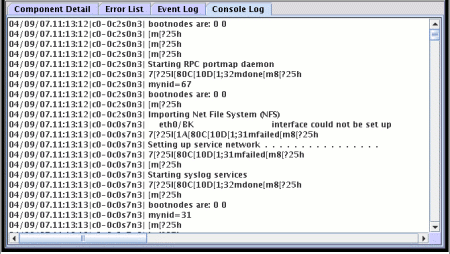
The console log displays console log messages from all XT nodes. You can display console output from selected nodes through the View Console Output menu option on the Component Detail popup menu.
|
|
Various actions and configuration options are available through the options on the toolbar menus in the upper left corner of the XTGUI window: Files, Actions, Preferences, and Help, listed here:
|
File |
Actions |
Preferences |
Help |
|
Save Node List Exit |
Show Components Show Active Commands Show Boot Configuration Show Server Status Import/Export Sections Show Locks |
General Connection Partition Configuration |
Help About |
File Menu
Save Node List:
Create a text file listing all CPUs in the system, marking each "n" for empty or disabled, "i" for service, "c" for compute. For example:
c0-0c0s0n0 i
c0-0c0s0n1 n
c0-0c0s0n2 n
c0-0c0s0n3 i
c0-0c0s1n0 c
c0-0c0s1n1 c
This text file is saved in the users home directory and the naming convention is: RsmsNodeList-mmdd-hhmm.ss.txt
Exit:
Exit the XTGUI application.
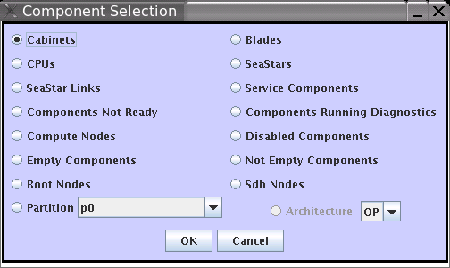
Show Components:
Select "Show Components" for a dialog that allows you to select physical or logical groupings of components:
|
|
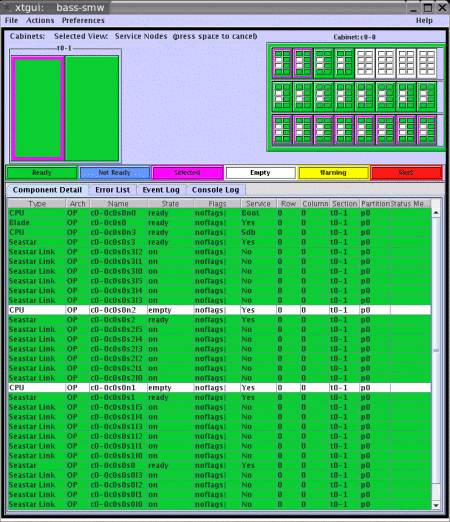
For example, if “Service Nodes” was chosen:
the cabinets containing service nodes would be selected in the system map;
the cabinet detail window would indicate which blades within a cabinet contained the service nodes, and;
the component detail table would be populated with service node component records (see Figure below).
|
|
Show
Active Cmds
This option displays a table of currently active commands that have been started by the XTGUI client.
|
|
Show Boot Configuration
This option displays a dialog that provides way to show the boot configuration of all XT partitions.
|
|
Show Server Status
This option displays a window that provides information on the XTGUI server process and lists all connected XTGUI clients.
|
|
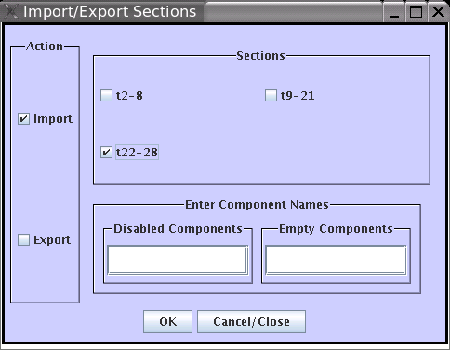
Import/Export Sections
This option displays a dialog to import or export sections of the XT system. It is enabled only if more than one section has been defined.
|
|
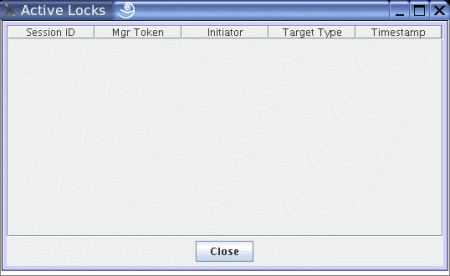
Show Locks
Show Locks displays all currently active session locks. A left-click selects rows in the table. A right-click pops up a menu allowing you to see the effected components for each session with an option to dismiss the lock.
|
|
Preferences Menu
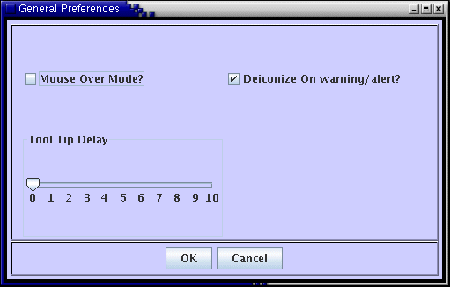
General
The General option displays a dialog that allows the configuration of three options:
Mouse over mode (which means to automatically switch the cabinet detail window to the cabinet in the system map that the mouse is currently hovering over).
Deiconize on warning/alert.
Tool tip delay.
|
|
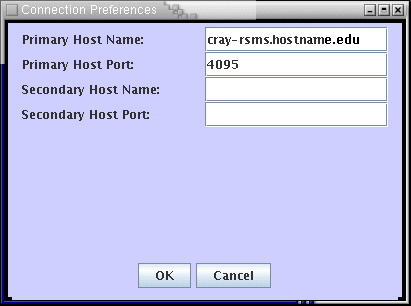
Connection
Use the Connection option to configure the host name and port number of the primary and secondary SMW systems.
|
|
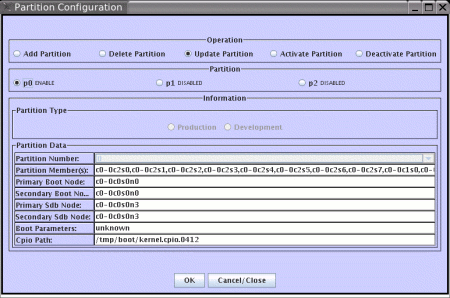
Partition Configuration
This option displays the dialog for the definition and modification of partitions.
|
|
Help Menu
Help
This option displays the XTGUI online help window.
|
|
About
Select About to display the version number of the XTGUI application in a pop up window.
This document describes the first release of the XTGUI. The goal in the first release was to provide a tool that would allow quick and simple component-fault identification. In succeeding releases, a greater variety of system information will be shown by the tool, including a number of environmental attributes such as temperatures, voltages, fan speeds, network counters, and so on. We invite you to submit suggestions as to how the product could be improved to better meet your needs.
Jim Robanske is the lead software engineer for the XTGUI project
at Cray Inc. He may be reached at jimr@cray.com.